Quick Bite: Apple provides a number of ways to export iPad, iPhone, and iPod Touch video, audio and graphics to external displays like a television or projector. Full user interface mirroring is only possible using iPad 2 and iPhone 4S devices. Mobile warriors generally will invest in an Apple TV 2 or an inexpensive remote control app.
Two major caveats: Full mirroring presents a security challenge as your password will be presented on the external display. And Apple TV 2 may not support the type of wifi security you use in a typical campus or office setting.
Being the head of IT for a major business school, I often get asked by professors and instructors how they can make use of their iPad to display classroom content on a projector or screen. Unless you're trapped behind a lectern or podium you need a lightweight, portable tool for displaying presentation materials. Tablet computers like Apple's iPad are ideally suited for the mobile presenters providing there is a way to export the iPad display to a monitor or projector. In this article I will cover the different ways to display content from your iPad, iPhone or iPod Touch (collectively known as
iOS devices).
Mirroring vs Video Output
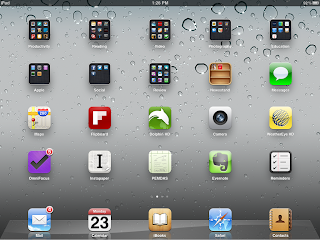 |
| Mirrored Springboard |
First, it is important to understand the differences between "mirroring" and "video-enabled apps". Mirroring refers to the ability to display the entire iOS interface on an external display. This includes not only the output of apps like Keynote or Videos but also Email, iCal, websites and even the app springboard itself (as illustrated here on the right).
Mirroring is supported
only with the iPad 2 and iPhone 4S. These devices output up to 1080p resolution and 720p for video. Please note that when mirroring ALL of the user interface is displayed to the screen including the virtual keyboard and the keys you are pressing
even if those keys are typing out your password. If you are going to enter a password then turn off mirroring first by using one of the methods described below.
All other iOS devices, including the original iPad, iPod Touch (2nd gen and up), and iPhone 3GS and up support video output only for video-enabled apps. Video-enabled apps are apps that have been specifically designed to output to an external display. The built-in Videos and YouTube apps, for example, can output video and audio. The iOS version of Keynote supports exporting its presentation display (it exports nothing while editing). These older iOS devices will output up to 720p (which is the resolution used in the new building classrooms). Even older devices like the original iPhone and earlier iPods can output video and audio only using a Composite Video Adaptor.
Video Adaptors
Apple and 3rd party vendors produce an array of adaptors that can be used to output iOS device displays. These adaptors all feature a standard Apple 30-pin doc connector on one end and a standard video connector on the other allowing you to connect video cables to your iOS device.
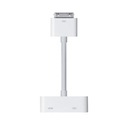 |
| Digital Display Adaptor |
Digital Display (HDMI) Adaptor
If you can guarantee that the displays or projectors you will be using support HDMI then this is definitely the adaptor to purchase. It supports full mirroring for iPad 2 and iPhone 4S devices and supports output for video-enabled apps on older devices. The one connector will carry both video and audio from the iOS device to the display.
VGA Adaptor
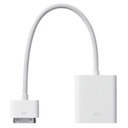 |
| VGA Adaptor |
If you can't guarantee that you'll always have an HDMI capable display then I recommend getting a VGA adaptor instead. VGA has been around far longer than HDMI and is almost always supported. You can still mirror your iPad 2 and iPhone 4S user interfaces and output the display for video-enabled apps on other devices. You'll need to use a stereo audio cable if audio is required.
Component/Composite Adaptor
You can also purchase adaptors for more traditional television displays including composite and analog HD component video. Almost all Apple devices, including legacy devices like the iPod Nano, are supported but you can only export audio, video and picture slideshows using this adaptor.
Regardless of the adaptor used, if you are expecting to wander freely around the classroom or boardroom projecting content from your iPad then none of the above solutions are for you. All of these solutions leave your device tethered to a video cable. In the next section I'll describe two options for untethered presentation of content.
Remote Control Apps
If your iOS device needs to be tethered why not control it via a remote control app on your iPhone or iPod Touch. This method can be used to control an iPad or a Mac. It's not the most elegant solution and remote control apps are usually limited to controlling only one kind of application. For instance, the
Apple Remote app can be used to control iTunes for playback of audio or video (
Tango Remote is similar).
Apple Keynote Remote can be used to control Keynote on a Mac or iOS device.
2Screens has its own
remote. And so on... A more general way to control a Mac or PC is via a VNC app running on your iOS device but that is beyond the scope of this article.
Apple TV 2
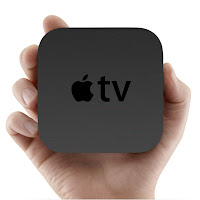
By far the most elegant solution for displaying your iOS device content is using an Apple TV 2 device. Or it would be the most attractive if not for
one frustrating flaw that Apple has not yet addressed (more on that in a moment).
Along with the introduction of the $99 (CDN$120) Apple TV 2 in September 2010, Apple introduced a feature called AirPlay which enabled the Apple TV 2 to serve as an output display for an iPad 2 or an iPhone 4S
without any video or audio cables. This enabled device mirroring as if a digital display adaptor is connected to your device.
To use AirPlay ensure that your Apple TV and iOS devices have the latest versions of software. You'll need iOS 4.3 or later on your iPad (1 or 2), iPhone 3GS or later, or iPod Touch 2nd gen or later. You'll also need Apple TV 4.2 or later on your Apple TV. If you routinely install updates when notified by Apple then you will be fine.
Once you are set up and on the
same wifi network, your iOS devices will automatically detect the presence of an available Apple TV. Video-enabled apps like Videos and YouTube will display an AirPlay icon (see right) when an Apple TV device is detected. Touch the icon and select the Apple TV device from the list to export the iOS display to the Apple TV. The AirPlay icon will then turn blue. Touch the AirPlay icon again to disable the external display (say, if you want to enter a password). This method works for any iOS device that supports video-enabled apps or full mirroring.
The other AirPlay method, available only for iPad 2 and iPhone 4S devices, enables full device mirroring. To do this, double-press the home button to display the multi-tasking bar and then swipe right. You should see something similar to the illustration below. The AirPlay icon will be displayed whenever an Apple TV 2 device is detected. Touch the AirPlay icon to enable full mirroring of the iPad 2 or iPhone 4S display. This will mirror all aspects of the display to the Apple TV device regardless of whether or not the app is video-enabled.
 |
| Enabling Mirroring |
Note that the iOS device and the Apple TV 2 need to be on the same wifi network for this to work. This is where it all breaks down for use in many corporate or campus settings.
At this time Apple TV 2 does not support WPA2 Enterprise encryption. Most well run corporate and campus wireless networks use this more robust type of wireless encryption. If you run a small, single subnet network (like a home network) then you might be ok. Regardless, lack of WPA2 Enterprise support on Apple TV is a huge oversight by Apple. Especially considering that Apple TV 2 runs iOS and all other iOS devices support this encryption method.
I hate to end on a bummer note but that's it. I've contacted Apple about this but they are characteristically tight lipped about when or even if this will be addressed. Given Apple's recent embrace of education technology I'm hoping that they fill this easy-to-fix hole.


