Showing posts with label mac. Show all posts

Thursday, January 26, 2012

How-to: Use an external display with an iPad, iPhone, or iPod Touch

Quick Bite: Apple provides a number of ways to export iPad, iPhone, and iPod Touch video, audio and graphics to external displays like a television or projector.  Full user interface mirroring is only possible using iPad 2 and iPhone 4S devices.  Mobile warriors generally will invest in an Apple TV 2 or an inexpensive remote control app.  Two major caveats: Full mirroring presents a security challenge as your password will be presented on the external display.  And Apple TV 2 may not support the type of wifi security you use in a typical campus or office setting.

Being the head of IT for a major business school, I often get asked by professors and instructors how they can make use of their iPad to display classroom content on a projector or screen.  Unless you're trapped behind a lectern or podium you need a lightweight, portable tool for displaying presentation materials.  Tablet computers like Apple's iPad are ideally suited for the mobile presenters providing there is a way to export the iPad display to a monitor or projector.  In this article I will cover the different ways to display content from your iPad, iPhone or iPod Touch (collectively known as iOS devices).

Mirroring vs Video Output

Mirrored Springboard
First, it is important to understand the differences between "mirroring" and "video-enabled apps".  Mirroring refers to the ability to display the entire iOS interface on an external display.  This includes not only the output of apps like Keynote or Videos but also Email, iCal, websites and even the app springboard itself (as illustrated here on the right).  Mirroring is supported only with the iPad 2 and iPhone 4S.  These devices output up to 1080p resolution and 720p for video.  Please note that when mirroring ALL of the user interface is displayed to the screen including the virtual keyboard and the keys you are pressing even if those keys are typing out your password.  If you are going to enter a password then turn off mirroring first by using one of the methods described below.

All other iOS devices, including the original iPad, iPod Touch (2nd gen and up), and iPhone 3GS and up support video output only for video-enabled apps.  Video-enabled apps are apps that have been specifically designed to output to an external display.  The built-in Videos and YouTube apps, for example, can output video and audio.  The iOS version of Keynote supports exporting its presentation display (it exports nothing while editing).  These older iOS devices will output up to 720p (which is the resolution used in the new building classrooms).  Even older devices like the original iPhone and earlier iPods can output video and audio only using a Composite Video Adaptor.

Video Adaptors

Apple and 3rd party vendors produce an array of adaptors that can be used to output iOS device displays.  These adaptors all feature a standard Apple 30-pin doc connector on one end and a standard video connector on the other allowing you to connect video cables to your iOS device.
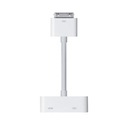
Digital Display Adaptor

Digital Display (HDMI) Adaptor

If you can guarantee that the displays or projectors you will be using support HDMI then this is definitely the adaptor to purchase.  It supports full mirroring for iPad 2 and iPhone 4S devices and supports output for video-enabled apps on older devices.  The one connector will carry both video and audio from the iOS device to the display.

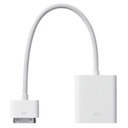
VGA Adaptor
VGA Adaptor

If you can't guarantee that you'll always have an HDMI capable display then I recommend getting a VGA adaptor instead.  VGA has been around far longer than HDMI and is almost always supported.  You can still mirror your iPad 2 and iPhone 4S user interfaces and output the display for video-enabled apps on other devices.  You'll need to use a stereo audio cable if audio is required.

Component/Composite Adaptor

You can also purchase adaptors for more traditional television displays including composite and analog HD component video.  Almost all Apple devices, including legacy devices like the iPod Nano, are supported but you can only export audio, video and picture slideshows using this adaptor.    

Regardless of the adaptor used, if you are expecting to wander freely around the classroom or boardroom projecting content from your iPad then none of the above solutions are for you.  All of these solutions leave your device tethered to a video cable.  In the next section I'll describe two options for untethered presentation of content.

Remote Control Apps

If your iOS device needs to be tethered why not control it via a remote control app on your iPhone or iPod Touch.  This method can be used to control an iPad or a Mac.  It's not the most elegant solution and remote control apps are usually limited to controlling only one kind of application.  For instance, the Apple Remote app can be used to control iTunes for playback of audio or video (Tango Remote is similar).  Apple Keynote Remote can be used to control Keynote on a Mac or iOS device.  2Screens has its own remote.  And so on...  A more general way to control a Mac or PC is via a VNC app running on your iOS device but that is beyond the scope of this article.

Apple TV 2

By far the most elegant solution for displaying your iOS device content is using an Apple TV 2 device.  Or it would be the most attractive if not for one frustrating flaw that Apple has not yet addressed (more on that in a moment). 

Along with the introduction of the $99 (CDN$120) Apple TV 2 in September 2010, Apple introduced a feature called AirPlay which enabled the Apple TV 2 to serve as an output display for an iPad 2 or an iPhone 4S without any video or audio cables.  This enabled device mirroring as if a digital display adaptor is connected to your device. 

To use AirPlay ensure that your Apple TV and iOS devices have the latest versions of software.  You'll need iOS 4.3 or later on your iPad (1 or 2), iPhone 3GS or later, or iPod Touch 2nd gen or later.  You'll also need Apple TV 4.2 or later on your Apple TV.  If you routinely install updates when notified by Apple then you will be fine.

Once you are set up and on the same wifi network, your iOS devices will automatically detect the presence of an available Apple TV.  Video-enabled apps like Videos and YouTube will display an AirPlay icon (see right) when an Apple TV device is detected.  Touch the icon and select the Apple TV device from the list to export the iOS display to the Apple TV.  The AirPlay icon will then turn blue. Touch the AirPlay icon again to disable the external display (say, if you want to enter a password).  This method works for any iOS device that supports video-enabled apps or full mirroring.   

The other AirPlay method, available only for iPad 2 and iPhone 4S devices, enables full device mirroring.  To do this, double-press the home button to display the multi-tasking bar and then swipe right.  You should see something similar to the illustration below.  The AirPlay icon will be displayed whenever an Apple TV 2 device is detected.  Touch the AirPlay icon to enable full mirroring of the iPad 2 or iPhone 4S display.  This will mirror all aspects of the display to the Apple TV device regardless of whether or not the app is video-enabled.

Enabling Mirroring

Note that the iOS device and the Apple TV 2 need to be on the same wifi network for this to work.  This is where it all breaks down for use in many corporate or campus settings.  At this time Apple TV 2 does not support WPA2 Enterprise encryption.  Most well run corporate and campus wireless networks use this more robust type of wireless encryption.  If you run a small, single subnet network (like a home network) then you might be ok.  Regardless, lack of WPA2 Enterprise support on Apple TV is a huge oversight by Apple.  Especially considering that Apple TV 2 runs iOS and all other iOS devices support this encryption method.  

I hate to end on a bummer note but that's it.  I've contacted Apple about this but they are characteristically tight lipped about when or even if this will be addressed.  Given Apple's recent embrace of education technology I'm hoping that they fill this easy-to-fix hole.  

Tuesday, August 9, 2011

How to revive Mac App Store when its stuck forever waiting...

I recently went to the App Store application on my Mac to download the Lion version of Apple's Xcode development tools.  I was prompted for my Apple ID and password (which I provided) and then I left the App Store app on its own to complete the download and install.  After about 30 minutes I went to check in on its progress and saw that it had downloaded exactly 0 bytes.  The status on the Purchased page was Waiting...

Waiting for Godot

...and waiting and waiting.  I quit and restarted App Store and still my downloads were stuck waiting.  I dug around a little and it turns out this is not an uncommon problem but the remedies suggested were all over the place.  Everything from installing updates and deleting caches (both good ideas) to deleting your Library folder (not a good idea).  I like to attack problems like this by starting with the easiest and least invasive measures.

I should state right off the bat that these solutions are meant to incur as little disruption as possible but do require the use of some programs that might not be in your usual repertoire: Activity Monitor and Terminal.  If you are at all uncomfortable using these tools you can always use that old Windows chestnut... reboot.  Yes, rebooting your Mac should have the same affect as solution 1 at least.  But if you don't want the hassle of rebooting then read on.


Solution 1: Kill the Zombie

The App Store uses a process called "storeagent" that runs continuously in the background.  It seems that sometimes this process can go a little wonky and fail to respond to requests to download app purchases.  What we want to do is kill this zombie process (it will start up again automatically).

Start Activity Monitor
First, quit the App Store application (e.g. by selecting "App Store->Quit App Store" or pressing Cmd-Q or click the red dot in the top left corner of the window).  Start up Activity Monitor (you'll find it on Lion's launchpad in the Utilities collection or using Finder in Applications/Utilities/Activity Monitor.  Activity monitor is used to display the processes running on your Mac.  You could go hunt around for the process called "storeagent" but an easier method is to enter "storeagent" in the Activity Monitor filter box as illustrated below (some of the numbers will be different).  Highlight the "storeagent" process by clicking on it.  The "Quit Process" stop sign should become available.  Go ahead and click on Quit Process to kill "storeagent". You'll be asked if you really want to quit the process.  Confirm by clicking "Quit".  Normally this should do the trick and the process will disappear immediately and be replaced a little while later by a new process (with a different number in the PID column).  However, if the process is a deep zombie, you will need to click "Force Quit" in the confirmation dialog.  Do this only as a last resort as it is possible to damage system files by using Force Quit too often. 

Activity Monitor Filtered for "storeagent".  Note the "Quit Process" stop sign is now clickable.

Now go ahead and restart the App Store application.  Click on Purchased, find your purchase and select Resume. After you enter your Apple ID and password your purchase should start downloading.   However, if the App Store is still stuck in Waiting move on to Solution 2.

Solution 2 - Purge the Caches

Solution 1 has always worked for me but I've heard of cases where more intervention is required.  If this fits your situation then go ahead and quit the App Store application again.  Now we do some typing into Terminal. You can find Terminal in the same Utilities folder that you found Activity Monitor.  When you start it, it should look something like below.

At the Terminal prompt
What we're going to do is use some commands to delete App Store caches.  You do not need to worry about deleting these files since, by definition, they are a copy of what is already stored on the Apple servers and will automatically be restored.  Type of the following commands exactly as you see below (in fact, go ahead and copy and paste them into Terminal).

rm -r ~/Library/Caches/com.apple.appstore
rm -r ~/Library/Caches/com.apple.storeagent
rm ~/Library/Preferences/com.apple.appstore.plist
rm ~/Library/Preferences/com.apple.storeagent.plist
rm ~/Library/Cookies/com.apple.appstore.plist

Now go and do the steps in Solution 1 again.  Once you're done that, start up App Store, go to Purchases, and select Resume on your download.  Enter your Apple ID and password and you're off to the races.

Thursday, July 21, 2011

Mac OS/X Lion, "Reverse" Scrolling, and Chrome

Up until yesterday's release of Mac OS/X Lion, the user interface metaphor for scrolling was that you manipulated the scrollbar on the side or bottom of your content (say a webpage).  So in order to scroll content upwards you swiped, wheeled, or otherwise moved down.  To scroll your content downwards you moved up.  This is a very computer-sciency method of scrolling in that the container had a dohicky (the scrollbar) that you touched to scroll.

Tablets and smartphones have flipped the metaphor on its head.  With a modern touch interface you manipulate the content directly.  If you want the content to scroll up off the top of your tablet you swipe it up.  To scroll the content down off the bottom of your tablet you swipe down.  All very natural.

One of the major themes of Apple's Lion release is the harmonizing of the touch and desktop interfaces including a change to how desktop scrolling works.  This change is immediately apparent when you load content in Safari.  First, there are no scrollbars.  Second, you swipe, wheel or otherwise move up in order to move your content up.  Apple calls this "natural scrolling".  This is initially disconcerting for most users since they've spent most of their computer lives doing the opposite.  You can configure Lion to do it "the old way" but I really encourage you to give it a chance.  In about 10 minutes (or nearly instantly if you're using a trackpad) your brain accepts the change and things settle down to normal.  Natural scrolling really feels natural.

In order for applications to behave correctly in Lion they do need to be updated.  This will take some time depending on the application's complexity and the ability of its owner to turn around change.  Google, for example, is actively modifying Chrome in order to provide the best Lion experience.  However, until they do, Chrome will act a little odd in Lion.  For example, it enters full screen mode quite nicely but it isn't immediately apparent how to exit it (see "How to exit full screen mode in Mac OS/X Lion (when you're stuck)" for more on this topic).

Another inconsistency is that the scrollbars are persistent rather than Lion transient.  Rather than waiting for Google to release a new version of Chrome for Lion you can get rid of those pesky, pixel hogging scrollbars now by using one of the scrollbar-remover extensions available on the Chrome web store.  I'm currently testing Scrollbar Hide by Saúl Pilatowsky.  By default it only hides the vertical scrollbar but you can configure it to hide both.  You can also configure it such that the scrollbars are either permanently disabled or appear "when needed" (basically when the mouse pointer roams close to the right or bottom edges).  Another option is No Scrollbar by Bestrafer which simply hides the vertical scrollbar.  For both extensions you may need to restart Chrome for the scroll bars to stay gone.  After that, you can take a tiny step closer to the full Lion experience.

Tuesday, August 31, 2010

How to create an HTML signature for Mac Mail

I recently updated my green signature and have had some questions about how I coaxed Mac Mail to do what I want.  My old green signature looked something like below.


This signature gets the job done but is a little wordy and too tall for my liking.  So I went into Mac Mail's signature editor and was horrified to find just how bad it is for editing anything other than simple text.  Undaunted, I did a little research and found that the signature in a Mac Mail message is nothing more than a snippet of HTML.  Without too many Unnatural Acts it is possible to use any HTML snippet for your signature.  My current signature looks like this.


I like the clean look and the familiar icons link you to exactly where you think they should.  As an added bit of bling the green message changes colour and size when moused over. 


When the user clicks on the link they are connected to my original "Keep it green" blog entry.  So how did I coax Mac Mail to use this signature?  Follow the steps below which I've cobbled together from multiple sources but most heavily from Wess Daniel's blog.
  1. Create your sexy signature using the HTML editor of your choice (I use VI.  You, quite likely, do not).  Feel free to use CSS and scripts since most email readers include full HTML browser capabilities.  Here is a sample HTML file based on my signature above.  Any images or linked content must reside on a publicly accessible location since only the URLs (and not the images themselves) are transmitted in your email message.  You'll notice from my sample that I use a Dropbox Public folder to store the images for my signature (all icons courtesy of IconDock.com).

  2. Once your signature looks the way you want load its HTML file in Safari.  Safari has the capability to store your signature as a webarchive.  Most other browsers and operating systems use MHTML to accomplish the same thing but Apple is Apple.  So pull down the File menu in Safari and Save As a webarchive.  Let's call it Sexy.webarchive for now. 

  3. In Mac Mail, open Preferences (Cmd-, or Preferences in the Mail menu) and select the Signatures icon.  Create a new signature and give it a name.  This will create a temporary webarchive to hold your signature.  You will replace this file shortly.  [NOTE: Technically you don't have to create a new signature but this is the easiest way to identify the new signature for the next steps.  You can reuse an existing signature and look in the plist file to figure out which one it is.]

  4. Drag the new signature to the mail accounts for which you'd like to use it and then quit Mac Mail.

  5. In Finder, go to ~/Library/Mail/Signatures.  You will see one or more files with names that look something like FA158A16-3D64-4B25-8C2C-5CCF1D7B85CD.webarchive.  The webarchive with the most recent date and time is the temporary signature you just created. 

  6. In Finder, locate Sexy.webarchive and rename it to match the long filename of your temporary signature.  Then copy or move your renamed signature file on top of the temporary signature.

  7. Restart Mail.  Now you should see your new sexy signature when you compose new messages.  If you're not seeing your new signature it could be that the signature is not associated with the mail account you are using (see step 4).  It could be that you have more than one signature associated with your mail account and you need to select your new signature (use the Signature pull down menu on the right side of the composition window).  
I hope that helps and keep spreading the green!

    Monday, August 30, 2010

    What's on your Mac?

    Within the span of a week, two good friends of mine decided that it was time to switch from PC to Mac.  I promised both of them a list of the Mac utilities and applications that I have found useful or interesting or fun on my Macs over the years.  Before I start I need to give props to my buddy Scott Corscadden who took the time to school me in the Way of Mac when I made my switch some years ago.

    1Password ($39.95) - This great utility keeps track of your passwords, log in ids, and form settings.  It can also generate strong passwords which you access with your 1Password password.  Integrates with all browsers.  You can even store your encrypted 1Password file on a file sharing service like Dropbox so that all your Macs, iPhones, iPads can access the same passwords.

    Adium (Free) - Are you an iChat or an MSN?  An AOL or a GTalk?  What about all your contacts?  Do they all use the same instant message service that you do?  With a product like Adium, it doesn't matter.  Use Adium to log into multiple IM services at the same time in the same interface.

    AppTrap (Free) - Uninstalling an application on a Mac is as simple as dragging it from Finder to your Trash bin.  While this does uninstall the application it has a side-effect of leaving behind application support files such as configuration files, caches, databases.  AppTrap will automatically detect an uninstall and, after prompting you for permission, delete all the support files for a clean uninstall.  CAUTION: Some application upgrade processes consist of uninstalling the old version and reinstalling the new version.  When doing an upgrade, select "Leave files" rather than "Move files".

    Dropbox (Free) - There are a few cloud storage services out there (including iDisk from Apple).  None are as seamless as Dropbox.  Configure a directory to be your Dropbox and any file you put in there will automatically be synchronized on the server and with any other client you have pointing to your account.  Share files seamlessly between your Macs, PCs, iPhones, iPads, Android phones, etc.  The first 2 gig is free.  50 gig costs $9.99/month. 

    Evernote (Free) - One of my all time favorites.  At first glance, Evernote seems like a regular text note taking tool.  But you can also take photo notes (with OCR) and audio notes.  Oh, and they're all seamlessly synchronized to the cloud.  And searchable.  Oh, and you can get clients for Mac, PC, iPhone, iPad, Android, Blackberry, Palm Pre, and Windows Mobile.  Awesome.

    Firefox (Free) - Safari is a damn fine browser.  In many respects it is superior to Firefox.  The killer Firefox feature for me is its plugins which I make heavy use of (perhaps a topic for another post).  True, Safari and Chrome both now support plugins but so far neither of them have as rich a set as Firefox.  The moment I can get all or even most of my plugins for Safari I will likely drop Firefox from my list.

    gfxCardStatus (Free) - Macbook Pros enjoy not one but two graphics processors.  An integrated processor which is light on features and easy on the battery and a discreet graphics processor stacked with features but can run your tank to empty in no time.  Apple's method of switching graphics processors is to change the setting in System Preferences and then reboot (Holy Microsoft Usability Batman!).  This utility will install a menu icon that not only tells you which card you're currently using but lets you switch back and forth between the two without rebooting.  Sweet.

    Growl (Free) - Growl is a simple notification platform.  Many other applications integrate with growl to inform you of updates, alerts and other information.  One interface for notifications.

    HandBrake (Free) - HandBrake converts to and from a multitude of audio and video formats.  Perfect for converting the format of the video your brother-in-law sent you to a format your television actually recognizes.

    Hula Girl (Free) - I don't know why I like this dashboard widget but I do.

    iStat Nano (Free) - This Dashboard widget gives you at-a-glance status information about various hardware and software components running on your Mac.

    iWork ($79.00) -This is Apple's office productivity suite consisting of Numbers spreadsheet, Pages word processor, and Keynote presentation software.  If you must work in a Microsoft Office environment then go get Office for Mac 2008 (2011 coming soon!).  If you don't, then get iWork.  It's much cheaper, has all the features that you're likely to need and Keynote kicks Powerpoint's ass simply by lifting its right eyebrow only.

    jitouch ($6.99) - Once you use the multitouch features of the Mac trackpad you will very rapidly learn to depend on it.  Using non-Mac trackpads becomes very frustrating when you find that all it does is move the mouse pointer and nothing else.  jitouch extends the multitouch capabilities with literally dozens of other gestures.  Easily worth the $6.99 price tag.

    MacVim (Free) - At the risk of starting a text editor flame war I'll go on record stating that I'm a VI fan and always have been.  MacVim is a terrific port of VIM (VI Improved).

    MenuMeters (Free) - MenuMeters puts a couple of handy indicators in your menu bar (at the top of the screen) for monitoring things like CPU, network, disk, etc.

    NTFS-3G (Free) - Mac OS/X does not natively recognize NTFS partitions.  If you have carved out some of your diskspace to run Windows (via Bootcamp, VirtualBox, or some other mechanism) you might want to install this NTFS read/write driver so that you can read the Windows file system from the Mac side.  There is also a commercial version of NTFS-3G called Tuxera if you prefer to spend money.

    OmniDiskSweeper (Free) - The Omni Group makes some really great products for Macs.  DiskSweeper is a free utility for managing your drive space.  With it you can find what's eating all the space.

    OmniFocus ($79.95) - The price is a little steep but without OmniFocus I would be a completely disorganized mess at work.  If you have read David Allen's Getting Things Done you will love the care that the Omni Group has taken in developing a product that so closely embodies the GTD principles.  Purchase the iPhone version as well and access your

    OmniGraffle ($99.95) -Another pricey-but-worth-it package, OmniGraffle is a sophisticated diagramming tool.  Similar to Microsoft Visio but with a more intuitive interface and richer presentation features, OmniGraffle makes the process of creating complex diagrams easy.  It even will output in Visio format for compatibility.

    Quicksilver (Free) - "Act without doing" is the tagline from Blacktree.  Their product, Quicksilver, is difficult to classify.  It leverages Spotlight, Apple's advanced search engine built into Mac OS/X, to easily find and access applications, contacts, music, files, and other data.  Without moving your fingers from the keyboard you can access just about anything on your Mac.  Quicksilver is indispensable. 

    Perian (Free) - "The swiss-army knife for QuickTime".  QuickTime is Apple's video viewer.  It's a great app with a simple, clean interface.  Just what you need if you have QuickTime video files to play.  For the other 99% of videos it is useless.  Enter Perian.  Perian adds QuickTime plugins to QuickTime to handle a multitude of other video formats.

    The Weather Network (Free) - This Dashboard widget from The Weather Network (Canadian) does a great job forecasting weather.  Get the iPhone version as well.

    TweetDeck (Free) - There are a handful of Twitter clients on the market but I prefer TweekDeck over them all.  In one interface you can not only get your Twitter stream, mentions, and directs but also add in Facebook, LinkedIn, Foursquare, and Buzz feeds.  Tweet and/or update your stats in any of these social media tools all from the TweetDeck interface.  Be sure to download the iPhone and iPad versions as well.

    VirtualBox (Free) - VirtualBox is yet another great free product from the once might Sun Microsystems (I'm really going to miss them).  Hopefully Oracle will continue to develop VirtualBox and keep it free.  VirtualBox is a Virtual Machine that allows you to run Windows, Linux, or other operating systems while running Mac OS/X at the same time.  For those of you that must cling to your favorite Windows programs, use VirtualBox until you kick the habit.  If you want a VM but would rather pay for it then try Parallels ($79.99) or VMWare Fusion ($79.99). 

    VLC (Free) - "It plays everything!"  If you need to play the few video formats that Perian doesn't handle then get VLC.  This little video player does indeed play just about any format.

    Adobe Reader (Free) - YAGNI (You Ain't Gonna Need It).  Mac OS/X handles PDF files natively.